The Test Team helps manage testing and triage across the WordPress ecosystem. They focus on user testing of the editing experience and WordPress dashboard, replicating and documenting bug reports, and supporting a culture of review and triage across the project.
Please drop by any time in SlackSlackSlack is a Collaborative Group Chat Platform https://slack.com/. The WordPress community has its own Slack Channel at https://make.wordpress.org/chat/ with questions or to help out.
Tag Archives: fse-testing-call
annezazu
10:48 pm on September 18, 2023 Tags: fse-testing-call
Block Hooks thanks to a special pluginPluginA plugin is a piece of software containing a group of functions that can be added to a WordPress website. They can extend functionality or add new features to your WordPress websites. WordPress plugins are written in the PHP programming language and integrate seamlessly with WordPress. These can be free in the WordPress.org Plugin Directory https://wordpress.org/plugins/ or can be cost-based plugin from a third-party. that adds a like button automatically as every Comment Template blockBlockBlock is the abstract term used to describe units of markup that, composed together, form the content or layout of a webpage using the WordPress editor. The idea combines concepts of what in the past may have achieved with shortcodes, custom HTML, and embed discovery into a single consistent API and user experience.’s last child.
Framing
You’re set to launch your new photography portfolio. You plan to add more content in the coming months so you want to ensure it’s well organized and well equipped for future tweaks/additions with new fonts and new patterns. When you originally started the site, you didn’t yet had a vision for how to finish it until now!
Testing Instructions
For this test, please use the following pre-built site as we’ll be rapidly switching between GutenbergGutenbergThe Gutenberg project is the new Editor Interface for WordPress. The editor improves the process and experience of creating new content, making writing rich content much simpler. It uses ‘blocks’ to add richness rather than shortcodes, custom HTML etc.
https://wordpress.org/gutenberg/ versions:
Please do not repeatedly open this link as it creates a new site each time and there’s a limit of 50 sites that can be created.
This will launch a site for you to use for up to 24 hours. Select “Magic Login” to log in to the wp-admin dashboard.
Save the link to your site so you can access it again during the test.
Manage fonts
Head to Appearance > Editor > Styles > and select the pencil icon to open up the Styles panel.
Select Typography to view a list of active fonts and click the “Aa” icon to open up font management.
Upload a new font file using the drag and drop option. You can download a font from https://fonts.google.com/.
From the font manager, select “Inclusive Sans”, a previously uploaded font, and choose “Delete” to uninstall this option.
From there, close out of the font manager, and change the Headings and Text font option to the new font you uploaded.
Save changes.
Get your site organized
Use Command + K or evoke the Command Palette by clicking on the Top Toolbar field and use it to open the List View (purposefully leaving out the exact command).
Select the Columns block containing the “Want to work with me?” text and, again using the Command Palette, group this block.
From there, you’ll see two different Group blocks on the page. Select each and, using the three dot menu in List View, find the “rename” option and give each a different name.
Create a pattern
Select the “Want to work with me?” Group block with its new name and open the block settings.
Under the Styles tab, add a black and white background image from the Media Library. Adjust the colors of the text as needed afterwards.
Using the three dot menu, create a new synced pattern for “Want to work with me?” content and add a categoryCategoryThe 'category' taxonomy lets you group posts / content together that share a common bond. Categories are pre-defined and broad ranging. of your choosing.
Finish your Portfolio page
Using the Command Palette, open the draft page titled “Portfolio”. On this page, you’re going to create three sections of photos “With People”, “Without people”, and “Black and White” to show off your work alongside a section of all of your photos already listed.
Add the unsynced pattern titled “Portfolio section” using whatever method of your choosing (Inserter with the + button in the top left or the Quick Inserter with the / option).
Using this pattern and the default content it provides, fill out the respective details including a proper heading, description, image with a set aspect ratio that epitomizes the rest of the images, and remaining gallery items. Here’s an example of what this should look like.
Create all three sections following these steps: “With People”, “Without people”, and “Black and White”.
Change the font for each of these headings to be different than the global option set originally in Styles (and ensure all options appear).
Open List View and rearrange each section in a different order by dragging and dropping with help from the image and gallery previews.
As a finishing touch, select the first standalone image in each section, open the Block Settings sidebarSidebarA sidebar in WordPress is referred to a widget-ready area used by WordPress themes to display information that is not a part of the main content. It is not always a vertical column on the side. It can be a horizontal rectangle below or above the content area, footer, header, or any where in the theme., and toggle on the option to “Expand on click”.
Swap templates
Once done, open Block Settings and, under the Page tab, select “Pages” next to Template.
From there, you’ll see options “Edit Template” or “Swap Template”. Select “Swap Template” and choose the “Portfolio” option.
Before saving, change the Page status to “Published”.
Save changes.
Use the Command Palette to view your site. Notice this new Portfolio page is automatically included in your menu and that when you hover over the first standalone image in each section there’s an option to expand it and view in isolation.
Announce your new portfolio and remove the Like button
Return to the Site Editor and, using the Command Palette, start the process to add a new post.
Title the post “Announcing my portfolio” and write a brief paragraph, including a List block that mentions each portfolio section (“With People”, “Without people”, and “Black and White”). Notice that the block toolbar always stays with the overall list rather than each individual item.
Publish the post and view it. Leave a comment on your own post and notice that there’s a Like button available.
Go back into the Post Editor and, using the Command Palette, open the Single Post template.
Using List View, select the Comment Template and open Block Settings. Notice there’s a Plugin section with a Like Button option turned on. Turn this option off and save changes.
Go further
From there, view your site, click around, and make any additional changes you’d like! Create new posts, create new patterns, or adjust your site’s styles. While this walks through an initial set of items, feel free to explore further based around the new features coming in 6.4.
What to notice:
Did the experience crash at any point?
Did the saving experience work properly?
What did you find particularly confusing or frustrating about the experience?
What did you especially enjoy or appreciate about the experience?
What would have made this experience easier for site building and for writing new content?
Did you find that what you created matched what you saw on your site?
Did it work using Keyboard only?
Did it work using a screen reader?
Did it work while using just a mobile device? Shout out to @nomadskateboarding for this addition!
WordPress 6.3 just launched this week, bringing with it the ability to build out all parts of your site without leaving the Site Editor. While we’ve tested everything leading up to the release, it’s time now to see how all of the pieces are landing with a fresh take, especially with all of the fixes found during the betaBetaA pre-release of software that is given out to a large group of users to trial under real conditions. Beta versions have gone through alpha testing in-house and are generally fairly close in look, feel and function to the final product; however, design changes often occur as part of the process. and RCRelease CandidateA beta version of software with the potential to be a final product, which is ready to release unless significant bugs emerge. periods, and to look ahead to where 6.4 aims to iterate.
To do this, this call for testing will go through a “starting from scratch” experience, from changing styles, using and creating patterns, creating a few pages, and setting up a menu. As part of this, you’ll explore new tools, like the Command Palette, and well loved tools, like List View. This test is intentionally more open ended to encourage exploration and to gather user experience feedback. It’s ultimately not about testing individual, new features and is more centered on testing how the features continue to come together.
Since the 6.4 cycle is a bit shorter than others, this call for testing will only be open for two weeks rather than three so additional testing can occur as more features and refinements are released.
Please do not repeatedly open this link as it creates a new site each time and there’s a limit of 50 sites that can be created.
This will launch a site for you to use for up to 24 hours. Select “Magic Login” to log in to the wp-admin dashboard.
Save the link to your site so you can access it again during the test.
To set up your own test site:
Have a test site using the latest version of WordPress. It’s important this is not a production/live site.
Install and activate the Twenty Twenty Three by going to Appearances > Themes.
Install and activate Gutenberg 16.4 or the latest version of GutenbergGutenbergThe Gutenberg project is the new Editor Interface for WordPress. The editor improves the process and experience of creating new content, making writing rich content much simpler. It uses ‘blocks’ to add richness rather than shortcodes, custom HTML etc.
https://wordpress.org/gutenberg/ after 16.4.
If you have any issues with manual setup, just comment on the post or pingPingThe act of sending a very small amount of data to an end point. Ping is used in computer science to illicit a response from a target server to test it’s connection. Ping is also a term used by Slack users to @ someone or send them a direct message (DM). Users might say something along the lines of “Ping me when the meeting starts.” me (@annezazu) in WordPress.orgWordPress.orgThe community site where WordPress code is created and shared by the users. This is where you can download the source code for WordPress core, plugins and themes as well as the central location for community conversations and organization. https://wordpress.org/slackSlackSlack is a Collaborative Group Chat Platform https://slack.com/. The WordPress community has its own Slack Channel at https://make.wordpress.org/chat/.
What follows are open ended tasks to complete, intentionally listed without detailed instructions in order to better stress test what’s been shipped in 6.3 and discover where the experience can be clarified:
Pick and save a new style variation.
Add a border to all Image blocks on your site and change the size of all H2 headings using Styles.
Create an “About” page and turn on the Top Toolbar setting. Copy and paste content from this Google Doc, noting any issues in pasting with the format or content.
Create a “Resume” page with a few different headings and use the Table of Contents blockBlockBlock is the abstract term used to describe units of markup that, composed together, form the content or layout of a webpage using the WordPress editor. The idea combines concepts of what in the past may have achieved with shortcodes, custom HTML, and embed discovery into a single consistent API and user experience. to better organize the page.
Change the size and alignment of the Page title in your Pages template.
At various points, use the Command Palette to either navigate between parts of your site or open various tools, like List View, or settings, like Top Toolbar.
Create a menu that just lists your About page, a link to your WordPress.org profile with the Social Icons block, and a Search block.
Create a synced pattern that details how to get in touch with you and add it to your “About” and “Resume” pages where you see fit.
Duplicate the synced pattern from the Patterns section and make an unsynced version.
If you’d like to go further and have time to do so, please explore the following: creating pages and editing the template surrounding the page & building and inserting more patterns, synced and unsynced.
If you get stuck at any point, please note it in the comments with details around where you tried to attempt to complete the task.
What to notice:
Did the experience crash at any point?
Did the saving experience work properly?
What did you find particularly confusing or frustrating about the experience?
What did you especially enjoy or appreciate about the experience?
What would have made this experience easier for site building and for writing new content?
Did you find that what you created matched what you saw on your site?
Did it work using Keyboard only?
Did it work using a screen reader?
Did it work while using just a mobile device? Shout out to @nomadskateboarding for this addition!
Similar to the twenty-third call for testing, various items slated for WordPress 6.3 are ready for exploration and testing. It’ll start out using an RCRelease CandidateA beta version of software with the potential to be a final product, which is ready to release unless significant bugs emerge. version of the 16.0 GutenbergGutenbergThe Gutenberg project is the new Editor Interface for WordPress. The editor improves the process and experience of creating new content, making writing rich content much simpler. It uses ‘blocks’ to add richness rather than shortcodes, custom HTML etc.
https://wordpress.org/gutenberg/ release to provide an early look at what’s to come and ensure feedback is timely with the upcoming release deadlines. While there are a lot of changes, big and small, expect this test to cover the following:
Taken together, these new tools and interface enhancements aim to create a more cohesive experience. Similar to a few prior calls for testing, the form of this test is going to be both prescriptive with steps to take in order to ensure certain features are covered and, at points, open-ended so you can explore and think of areas to improve.
I will be out for two weeks so @bph will be covering responding to this call for testing. Big thank you!
Framing
You run a website with a few others for a fictional town called Momery where you all share upcoming community events for folks to join. After a recent meeting about the website, your task is to implement a few changes: a new footer for parts of the site, a new post layout on the homepage to remove images, a call to action to encourage folks to host across your site, and a new page. As you work, you rely on revisionsRevisionsThe WordPress revisions system stores a record of each saved draft or published update. The revision system allows you to see what changes were made in each revision by dragging a slider (or using the Next/Previous buttons). The display indicates what has changed in each revision. to try out different options and patterns to speed up creation.
Please do not repeatedly open this link as it creates a new site each time and there’s a limit of 50 sites that can be created.
This will launch a site for you to use for up to 24 hours. Select “Magic Login” to log in to the wp-admin dashboard.
Save the link to your site so you can access it again during the test.
To set up your own test site:
Have a test site using the latest version of WordPress. It’s important this is not a production/live site.
Install and activate the Twenty Twenty Three One by going to Appearances > Themes.
Install and activate Gutenberg 16.0 RC1 or the latest version of Gutenberg after 16.0 RC1.
Head to Tools > Import and import this file to have access to the same content as above. From there, create a simple menu.
If you have any issues with manual setup, just comment on the post or pingPingThe act of sending a very small amount of data to an end point. Ping is used in computer science to illicit a response from a target server to test it’s connection. Ping is also a term used by Slack users to @ someone or send them a direct message (DM). Users might say something along the lines of “Ping me when the meeting starts.” me (@annezazu) in WordPress.orgWordPress.orgThe community site where WordPress code is created and shared by the users. This is where you can download the source code for WordPress core, plugins and themes as well as the central location for community conversations and organization. https://wordpress.org/slackSlackSlack is a Collaborative Group Chat Platform https://slack.com/. The WordPress community has its own Slack Channel at https://make.wordpress.org/chat/.
Create a few new items to exist across your site
Head to Appearance > Site Editor > Templates > Home.
Change the Query LoopLoopThe Loop is PHP code used by WordPress to display posts. Using The Loop, WordPress processes each post to be displayed on the current page, and formats it according to how it matches specified criteria within The Loop tags. Any HTML or PHP code in the Loop will be processed on each post. https://codex.wordpress.org/The_LoopblockBlockBlock is the abstract term used to describe units of markup that, composed together, form the content or layout of a webpage using the WordPress editor. The idea combines concepts of what in the past may have achieved with shortcodes, custom HTML, and embed discovery into a single consistent API and user experience. pattern to use a different one that doesn’t show the featured images of each post.
Make the menu in the HeaderHeaderThe header of your site is typically the first thing people will experience. The masthead or header art located across the top of your page is part of the look and feel of your website. It can influence a visitor’s opinion about your content and you/ your organization’s brand. It may also look different on different screen sizes. always show up as an icon with three lines instead of two.
Save changes.
At the bottom of the template, create a new Footer template part with a full width layout and three columns using the supplied patterns. Ensure this template part matches the background of the site.
Create a new menu within the new template part with links to Host, Partners, Pricing and a search block.
Create a reusable block with a call to action around hosting an event with Momery with buttons linking to both the “Host” and “Pricing” pages (select the blocks of your choosing > open the three dot menu in the block toolbar > select “Create Reusable block”) . As a reminder, consider how patterns might be used for inspiration.
Save changes.
Use the command-k tool to invoke the command center to ensure both the new footer template part and the reusable block with the call to action exist across your Page template and Single template.
Edit pages and templates
Edit your About page to add a featured imageFeatured imageA featured image is the main image used on your blog archive page and is pulled when the post or page is shared on social media. The image can be used to display in widget areas on your site or in a summary list of posts. from your media library. Navigate there however you’d like.
Edit your Page template so that the featured image appears full width at 400px height with a duotone filterFilterFilters are one of the two types of Hooks https://codex.wordpress.org/Plugin_API/Hooks. They provide a way for functions to modify data of other functions. They are the counterpart to Actions. Unlike Actions, filters are meant to work in an isolated manner, and should never have side effects such as affecting global variables and output. of your choosing.
Change the location of the featured image for the Page template. Make any other changes you’d like to it!
Click the title bar to open the command center and switch to the Contact page.
Edit the Contact page to add in your preference for communication (email, text, phone call, video chat).
Click the W icon to open the Site View, find the Pages section, and click the + button to draft a new page titled “Portfolio”. Make any changes you’d like for the page, including adding any patterns.
Save changes.
Go back to your dashboard when done, head to Pages, and publish the page you just created to ensure it shows up on your site.
Roll back some changes
Return to the Site Editor by going to Appearance > Editor and select Templates > Home.
Open block settings and head to the Template tab.
Notice there is a revision section at the bottom and select it.
Roll back to the prior Footer template part so that just your home template is no longer using one with the three columns, instead opting for a simpler version.
Re-add the call to action reusable block you created.
Save changes.
Explore the Library
Click the W icon to open the Site View and select Library.
Find and open the reusable block you created earlier and make a few changes to the text.
Save changes and check to ensure those changes are visible across your site.
Explore further – here are some ideas:
Make changes to your various pieces of your site and explore using the revision history more.
Change Style variations to switch up the theme style. In the Site View, use the addition of the Stylebook to see all of your changes.
Use the command center to continue jumping around to different parts of your site, make change, and save.
Explore creating and editing more pages, templates, template parts, and reusable blocks.
What to notice:
Did the experience crash at any point?
Did the saving experience work properly?
What did you find particularly confusing or frustrating about the experience?
What did you especially enjoy or appreciate about the experience?
What would have made this experience easier?
Did you find that what you created matched what you saw on your site?
Did it work using Keyboard only?
Did it work using a screen reader?
Did it work while using just a mobile device? Shout out to @nomadskateboarding for this addition!
With the roadmap to 6.3 published and another version of GutenbergGutenbergThe Gutenberg project is the new Editor Interface for WordPress. The editor improves the process and experience of creating new content, making writing rich content much simpler. It uses ‘blocks’ to add richness rather than shortcodes, custom HTML etc.
https://wordpress.org/gutenberg/ out in the wild, it’s time to test some of the upcoming features that are in the works to upgrade and polish the experience of using the Site Editor:
Styles in Site View displaying style variations and improving discoverability of the more granular Style interface.
Pages in Site View, rendering the last 10 pages with a link to the wp admin page list at the bottom.
Command center, offering a quick way to switch between parts of your site.
Add previewing for block themes unlocking the ability to check out a blockBlockBlock is the abstract term used to describe units of markup that, composed together, form the content or layout of a webpage using the WordPress editor. The idea combines concepts of what in the past may have achieved with shortcodes, custom HTML, and embed discovery into a single consistent API and user experience. theme before activating in the same Site Editor experience.
Navigation block using the Interactivity API as a way to test the new, in-progress APIAPIAn API or Application Programming Interface is a software intermediary that allows programs to interact with each other and share data in limited, clearly defined ways.. This is just a technical change and the aim here is to ensure the experience is the same.
Details block, adding a new way to hide and reveal information.
Much of the above is in an iterative state with more to come, like improved Detail pages with additional functionality, so this is a great chance to provide early feedback on important features. As always, the steps here are mean to guide you through the high level view of the features but you’re welcome to take the experience further by customizing more.
Framing
Like the last call for testing, you run a site that captures “Daily Delights” about the power of everyday moments to create joy. When you first put the site together, you didn’t have a full vision of what you wanted and, after a recent post went viral, you want to make some quick changes to better reflect what you’re accomplishing. As part of this, you preview a block theme to get a sense of whether you want to switch, create a new “Work with me” page, and update your “About” page while making high level changes to your templates and Styles. Streamlining and supporting this experience are the new command center tool and revision history for styles.
Please do not repeatedly open this link as it creates a new site each time and there’s a limit of 50 sites that can be created.
This will launch a site for you to use for up to 24 hours. Select “Magic Login” to log in to the wp-admin dashboard.
Save the link to your site so you can access it again during the test.
To set up your own test site:
Have a test site using the latest version of WordPress. It’s important this is not a production/live site.
Install and activate the Twenty Twenty Three One by going to Appearances > Themes.
Install and activate Gutenberg 15.8+. From there, head to Gutenberg > Experiments and turn on the Command Center, Details block, Block Theme Previews, and Navigation block experiments.
Head to Tools > Import and import this file to have access to the same content as above. From there, create a simple menu.
If you have any issues with manual setup, just comment on the post or pingPingThe act of sending a very small amount of data to an end point. Ping is used in computer science to illicit a response from a target server to test it’s connection. Ping is also a term used by Slack users to @ someone or send them a direct message (DM). Users might say something along the lines of “Ping me when the meeting starts.” me (@annezazu) in WordPress.orgWordPress.orgThe community site where WordPress code is created and shared by the users. This is where you can download the source code for WordPress core, plugins and themes as well as the central location for community conversations and organization. https://wordpress.org/slackSlackSlack is a Collaborative Group Chat Platform https://slack.com/. The WordPress community has its own Slack Channel at https://make.wordpress.org/chat/.
Preview block themes
Note: If you want to explore other block themes, you’re free to do so! You will have to install them first for the preview to work due to this bug. Please just ensure that you end up using “Twenty Twenty-Three”.
Head to Appearance > Themes where you’ll see a few block themes installed. Select the option to Live Preview the “Twenty Twenty-Three” theme.
This will take you to a new preview option using the Site Editor where you can explore the theme.
Select the Style section and choose a style variation you like. Click “Activate and Save”. This will keep you in the Site Editor with the new theme in place.
Rely on revisionsRevisionsThe WordPress revisions system stores a record of each saved draft or published update. The revision system allows you to see what changes were made in each revision by dragging a slider (or using the Next/Previous buttons). The display indicates what has changed in each revision.
Click the pencil icon next to Styles to open up more granular style options. Make whatever changes you’d like: add a custom color to your palette (Colors > Palette > Custom) or change the details of individual heading levels (Typography > Headings). Save your changes.
After making and saving a few changes, click the three dot menu in the Styles panel and select the last option for revisions. Here’s a visual.
View different revisions by clicking on them and roll back to a prior version of your choosing by selecting “Apply”.
Make more changes to Styles either to the overall site or to individual blocks. Once more, view the revisions and decide whether to roll back.
Content and template editing
Click the W icon to return to the Site View and use the back arrows to return to the main Design section before selecting the Pages section. From there, choose “About” and click on the canvas to edit it or click the pencil icon next to About in the sidebarSidebarA sidebar in WordPress is referred to a widget-ready area used by WordPress themes to display information that is not a part of the main content. It is not always a vertical column on the side. It can be a horizontal rectangle below or above the content area, footer, header, or any where in the theme..
Add a details block and shorten the About page by writing a one line summary where it says “Write summary”. Take the remaining About page content, cut it, and add it to the section where it says “Type / to add a hidden block”. Feel free to customize this as much as you’d like.
Add a featured imageFeatured imageA featured image is the main image used on your blog archive page and is pulled when the post or page is shared on social media. The image can be used to display in widget areas on your site or in a summary list of posts. to the page by clicking the upload icon when hovering over the block and, using List View, move it closer to the top of the template. Make any additional changes to the block order that you’d like using List View.
Save your changes.
Using the command tool
Click the W icon to return to the Site View and use the back arrows to return to the main Design section before selecting the Template section. From there, choose the “Home” template and click on the canvas to edit it or click the pencil icon next to the template name in the sidebar.
Select the Navigation block and add a new item to the menu by clicking the + button in the editor itself (not in the settings sidebar).
Instead of adding a current page, search for “Work with me” and notice the option to create a draft page with that title. Select that option.
Press cmd + k (or ctrl + k on Windows and Linux) shortcut to open the command center and type in “About” to quickly switch to the About page.
Add in a brief note about being open to working with others in the About page content before using the same cmd + k (or ctrl + k on Windows and Linux) shortcut to switch back to the homepage template by typing “home”.
Select the overall Navigation block and make a few style or settings changes, like changing the color options or the overlay display.
Click the W icon to return to the Site View and notice you have a few changes to save. Click Save and complete the save process.
Publish and view
Use the back arrows to return to the main Design section before selecting the Pages section once more.
Select “Manage all pages” where you will be brought to the Pages section of the WordPress admin.
Publish the “Work with me” page before viewing your site and exploring it to ensure all of the changes you want look as you want. Be sure to click on navigation items!
What to notice:
Did the experience crash at any point?
Did the saving experience work properly?
What did you find particularly confusing or frustrating about the experience?
What did you especially enjoy or appreciate about the experience?
What would have made this experience easier?
Did you find that what you created matched what you saw on your site?
Did it work using Keyboard only?
Did it work using a screen reader?
Did it work while using just a mobile device? Shout out to @nomadskateboarding for this addition!
While the release of 6.2 brought loads of new features to the site editing experience, feature development has continued in the GutenbergGutenbergThe Gutenberg project is the new Editor Interface for WordPress. The editor improves the process and experience of creating new content, making writing rich content much simpler. It uses ‘blocks’ to add richness rather than shortcodes, custom HTML etc.
https://wordpress.org/gutenberg/pluginPluginA plugin is a piece of software containing a group of functions that can be added to a WordPress website. They can extend functionality or add new features to your WordPress websites. WordPress plugins are written in the PHP programming language and integrate seamlessly with WordPress. These can be free in the WordPress.org Plugin Directory https://wordpress.org/plugins/ or can be cost-based plugin from a third-party., leaving us with the next lineup of cutting edge features to test and refine. This includes looping back on the new navigation section that was removed for WordPress 6.2. The aim of this call for testing is to both get feedback on what’s landed in 6.2 in the pursuit of continuous iteration and to dig into what’s being worked on for the remainder of phase 2 items including:
As always, these calls for testing will also explore current features that have been staples since the beginning of the introduction of the site editor, like the Navigation blockBlockBlock is the abstract term used to describe units of markup that, composed together, form the content or layout of a webpage using the WordPress editor. The idea combines concepts of what in the past may have achieved with shortcodes, custom HTML, and embed discovery into a single consistent API and user experience. or Template Part blocks.
Framing
You run a site that captures “Daily Delights” about the power of everyday moments to create joy. You want to create a new front page of your site that’s more colorful to reflect the nature of your content. When you chose your theme, you knew it came with a few front page options thanks to patterns so you decided to check out what’s possible. Once you have a new front page option in place, you decide to make some additional changes to your template and navigation to better personalize this new experience of your site.
Please do not repeatedly open this link as it creates a new site each time and there’s a limit of 50 sites that can be created.
This will launch a site for you to use for up to 24 hours. Select “Magic Login” to log in to the wp-admin dashboard.
Save the link to your site so you can access it again during the test.
To set up your own test site:
Have a test site using the latest version of WordPress. It’s important this is not a production/live site.
Install and activate the Twenty Twenty Three One by going to Appearances > Themes.
Install and activate Gutenberg 15.5.1. From there, head to Gutenberg > Experiments and turn on the Grid variation for Group block experiment.
Head to Tools > Import and import this file to have access to the same content as above. From there, create a simple menu and add a few widgets.
If you have any issues with manual setup, just comment on the post or pingPingThe act of sending a very small amount of data to an end point. Ping is used in computer science to illicit a response from a target server to test it’s connection. Ping is also a term used by Slack users to @ someone or send them a direct message (DM). Users might say something along the lines of “Ping me when the meeting starts.” me (@annezazu) in WordPress.orgWordPress.orgThe community site where WordPress code is created and shared by the users. This is where you can download the source code for WordPress core, plugins and themes as well as the central location for community conversations and organization. https://wordpress.org/slackSlackSlack is a Collaborative Group Chat Platform https://slack.com/. The WordPress community has its own Slack Channel at https://make.wordpress.org/chat/.
Create a new Front Page
Head to Appearance > Editor and select Templates. Click through a few of the templates to get a feel for your site and notice how a preview is shown of each template when you do so. To go back to view all templates, select the > arrow.
Click the + next to Templates in the dark gray sidebarSidebarA sidebar in WordPress is referred to a widget-ready area used by WordPress themes to display information that is not a part of the main content. It is not always a vertical column on the side. It can be a horizontal rectangle below or above the content area, footer, header, or any where in the theme. and select “Front Page”.
This will open up a modal where you can choose between different patterns to begin building your template. Select the second pattern with various green colors depicted. This will bring you to the Front Page template with that pattern inserted automatically.
Use the Grid layout
Using List View, select the second Group block that contains the Query LoopLoopThe Loop is PHP code used by WordPress to display posts. Using The Loop, WordPress processes each post to be displayed on the current page, and formats it according to how it matches specified criteria within The Loop tags. Any HTML or PHP code in the Loop will be processed on each post. https://codex.wordpress.org/The_Loop block.
Open the block settings and choose to transform it to a Grid layout. Here’s a visual.
After doing so, under Layout in block settings, change around the values of MINIMUM COLUMN WIDTH until you like how it looks.
Underneath this Group block, add an additional Grid group block variation by either directly searching for “Grid” or adding a Group block and selecting the Grid variation.
Explore using this block. This is intentionally an open ended item to encourage you to explore what this experimental block can do. For example, you could add a section of images or different sections of Headings and paragraph blocks grouped within a Grid block or a section of hashtags you want folks to use. Here’s an example of this last item.
Save changes.
Create a new page (or pages) for navigation
Select the Navigation Block in your headerHeaderThe header of your site is typically the first thing people will experience. The masthead or header art located across the top of your page is part of the look and feel of your website. It can influence a visitor’s opinion about your content and you/ your organization’s brand. It may also look different on different screen sizes. and select the option to “Edit” converting your menu to individual blocks.
Add a new item to the menu by clicking the + button in the editor itself (not in the settings sidebar).
Instead of adding a current page, search for “Inspiration” and notice the option to create a draft page with that title. Select that option.
Create as many draft pages as you’d like using the same process.
Add a search block to your menu and customize it.
Save changes.
Manage your navigation and explore your pages
Select the WordPress icon to open up the dark gray sidebar and use the > arrows to go back to the overall Design section.
Notice there is now a Navigation section. Select it and rearrange your menu items from there.
Select a page in your menu and notice that you can edit it directly either by clicking on the canvas or selecting the pencil icon in the sidebar. Make changes to this page and don’t save in the editor.
Instead select the WordPress icon to open up the dark gray sidebar and notice a Save option in the sidebar itself.
Select the save option there and select Save again from the modal.
Repeat this process with another page in your menu, saving where you’d like.
When done, go back to wp-admin > Pages and publish your pages to ensure they appear correctly in the navigation of your site.
What to notice:
Did the experience crash at any point?
Did the saving experience work properly?
What did you find particularly confusing or frustrating about the experience?
What did you especially enjoy or appreciate about the experience?
What would have made this experience easier?
Did you find that what you created matched what you saw on your site?
Did it work using Keyboard only?
Did it work using a screen reader?
Did it work while using just a mobile device? Shout out to @nomadskateboarding for this addition!
Building off of the last call for testing, this effort includes both some new and some repeat items that have continued to be iterated upon. In particular, browse mode’s design continues to evolve with a clearer edit button and design of the currently active template. Tied to this, the new UXUXUX is an acronym for User Experience - the way the user uses the UI. Think ‘what they are doing’ and less about how they do it. for the navigation blockBlockBlock is the abstract term used to describe units of markup that, composed together, form the content or layout of a webpage using the WordPress editor. The idea combines concepts of what in the past may have achieved with shortcodes, custom HTML, and embed discovery into a single consistent API and user experience. has received numerous improvements as work is underway to move the option out of experimental. Taken together, this test helps underscore just how much a single theme allows you to do and how the Site Editor tools are evolving to make quick customization increasingly intuitive.
Introduce a new UX for the navigation block where changes (adding new menu items, creating a new menu, etc) can be made from within the block settings sidebarSidebarA sidebar in WordPress is referred to a widget-ready area used by WordPress themes to display information that is not a part of the main content. It is not always a vertical column on the side. It can be a horizontal rectangle below or above the content area, footer, header, or any where in the theme..
Color randomizer that allows you to quickly switch between generated palettes.
As with last time, this post will be updated to the latest version of GutenbergGutenbergThe Gutenberg project is the new Editor Interface for WordPress. The editor improves the process and experience of creating new content, making writing rich content much simpler. It uses ‘blocks’ to add richness rather than shortcodes, custom HTML etc.
https://wordpress.org/gutenberg/ so the latest changes can be tested ahead of the 6.2 release cycle for a faster and more accurate feedback loopLoopThe Loop is PHP code used by WordPress to display posts. Using The Loop, WordPress processes each post to be displayed on the current page, and formats it according to how it matches specified criteria within The Loop tags. Any HTML or PHP code in the Loop will be processed on each post. https://codex.wordpress.org/The_Loop.
Framing
To ground this experience a tiny bit more, let’s pretend you’re switching over from a Classic theme to a Block theme. After switching, you will need to import the widgets settings before re-imagining the homepage of the site, including the navigation. You’ll end by exploring various ways to style the site across different templates, both by using the Style Book and by editing blocks individually before pushing those changes globally. Your aim is to make the site look as different as possible a few times over until you find a version you’re happy with. Imagine this is your way of exploring the reaches of what’s possible with the Site Editor, all while using a single theme!
Please do not repeatedly open this link as it creates a new site each time and there’s a limit of 50 sites that can be created.
This will launch a site for you to use for up to 24 hours. Select “Magic Login” to log in to the wp-admin dashboard.
Save the link to your site so you can access it again during the test.
To set up your own test site:
Have a test site using the latest version of WordPress. It’s important this is not a production/live site.
Install and activate the Twenty Twenty Three One by going to Appearances > Themes.
Install and activate Gutenberg 15.0. From there, head to Gutenberg > Experiments and turn every experiment except for “Zoomed out view”.
Head to Tools > Import and import this file to have access to the same content as above. From there, create a simple menu and add a few widgets.
If you have any issues with manual setup, just comment on the post or pingPingThe act of sending a very small amount of data to an end point. Ping is used in computer science to illicit a response from a target server to test it’s connection. Ping is also a term used by Slack users to @ someone or send them a direct message (DM). Users might say something along the lines of “Ping me when the meeting starts.” me (@annezazu) in WordPress.orgWordPress.orgThe community site where WordPress code is created and shared by the users. This is where you can download the source code for WordPress core, plugins and themes as well as the central location for community conversations and organization. https://wordpress.org/slackSlackSlack is a Collaborative Group Chat Platform https://slack.com/. The WordPress community has its own Slack Channel at https://make.wordpress.org/chat/.
Switch your site
Explore your site and feel free to add in more personalized items, whether by adding or customizing menus under Appearance > Menus or more widgets under Appearance > Widgets.
When you’re ready, head to Appearance > Themes and select “Activate” next to the Twenty Twenty-Three theme.
Head to Appearance > Editor (betaBetaA pre-release of software that is given out to a large group of users to trial under real conditions. Beta versions have gone through alpha testing in-house and are generally fairly close in look, feel and function to the final product; however, design changes often occur as part of the process.) to be brought into the browse mode experiment in the Site Editor.
Click through the different templates and template parts to view the various parts of your site. Eventually, select your Home template and choose the option to “Edit”. Notice that your previously created menu was automatically imported.
Import your widgets and customize your navigation
Using List View, select your Footer Template Part and delete it.
Add a new Template Part block, give it a name related to footer, and choose the option to “Start Blank”.
Open the block settings and expand the Advanced section. Under “IMPORT WIDGETWidgetA WordPress Widget is a small block that performs a specific function. You can add these widgets in sidebars also known as widget-ready areas on your web page. WordPress widgets were originally created to provide a simple and easy-to-use way of giving design and structure control of the WordPress theme to the user. AREA”, select the widgets section you’d like to import and click “Import”.
After importing, customize this new footer further as you’d like. Explore using design tools, using group/row/stack variations, and more.
Once done, select the Navigation block and change a few things as you see fit. For example, you can: move some of the sub menu items to top level items, change the names of a few of the menu items, adjust the spacing between items, and customize the mobile display as you see fit.
Save changes.
Find your style
Open Styles and select “Browse Styles”.
Open the Style Book by selecting the icon that looks like an eye from the main Styles interface and switch between various style variations while viewing how it impacts your site. Here’s a screenshot in case it’s helpful. This will open up an interface called the “stylebook” where you can see the styles for every block displayed. You can click that icon to toggle this option on/off as you’d like.
After selecting a style variation you like, head back to the main Styles interface and select “Colors”. From there, choose the “Randomize colors” option to change the colors further.
After exploring the “Randomizer colors” option, head back to the main Styles interface and select “Blocks”. From there, choose a block with a style variation, like Button (not Buttons!) or Social Icons or Site Logo. You can then edit that variation to your liking globally.
Switch it up (again and again)
Now that you have explored browsing Templates and Template Parts, the Style Book, customizing the Navigation block, and using the color randomizer, use this experience to switch up your site further. To do so, open a template, like the Single or Search template, and edit an individual block, like the Post Title or Featured ImageFeatured imageA featured image is the main image used on your blog archive page and is pulled when the post or page is shared on social media. The image can be used to display in widget areas on your site or in a summary list of posts..
After editing the block to your liking, open the Settings tab, expand the “Advanced” section, and choose the option to “Apply globally”.
Save changes and repeat this process a few times as you have time across templates and different blocks, relying on the Stylebook or Browse mode as needed to get a larger sense of your site. Try to make your site look as different as possible each time.
Bonus: Use patterns as much as you’d like as you customize your site! You can do this by adding patterns directly or by using the “replace” option in blocks like the Query Loop or Template Part.
With work deeply underway to refine and wrap up numerous aspects of phase 2, this call for testing centers numerous changes in progress to put them to the test (get it) and find the edges of what’s being worked on. At a high level, this test covers the following:
Introduce a new UX for the navigation block where changes (adding new menu items, creating a new menu, etc) can be made from within the blockBlockBlock is the abstract term used to describe units of markup that, composed together, form the content or layout of a webpage using the WordPress editor. The idea combines concepts of what in the past may have achieved with shortcodes, custom HTML, and embed discovery into a single consistent API and user experience. settings sidebarSidebarA sidebar in WordPress is referred to a widget-ready area used by WordPress themes to display information that is not a part of the main content. It is not always a vertical column on the side. It can be a horizontal rectangle below or above the content area, footer, header, or any where in the theme..
Taken together, these changes make it easier to navigate between the content you want to edit, see changes at scale when working with Styles in a few ways, create an easier navigation editing/creation experience, and have a more intuitive experience when editing individual blocks.
Framing: Refining a client’s site
To ground this experience a tiny bit more, let’s pretend you’re doing some refinements to a client’s site to finetune their branding and, as a result, homepage and navigation. The aim is to go from a more complex navigation structure to a simplified one, with two different options to choose from for the client (edit current menu and create a new option). Tied to this, the homepage will shift the focus of content in the Query LoopLoopThe Loop is PHP code used by WordPress to display posts. Using The Loop, WordPress processes each post to be displayed on the current page, and formats it according to how it matches specified criteria within The Loop tags. Any HTML or PHP code in the Loop will be processed on each post. https://codex.wordpress.org/The_Loop block with more of an emphasis on images (and whatever else you’d like). Finally, you will update the overall styling as you see fit, with bonus ideas for those who have extra capacity and interest!
Please do not repeatedly open this link as it creates a new site each time and there’s a limit of 50 sites that can be created.
This will launch a site for you to use for up to 24 hours. Select “WP Admin Login” and use the information provided to log in.
Save the link to your site so you can access it again during the test.
To set up your own test site (skip if using the above):
Have a test site using the latest version of WordPress. It’s important this is not a production/live site.
Install and activate the Twenty Twenty Three theme by going to Appearances > Themes.
Install and activate GutenbergGutenbergThe Gutenberg project is the new Editor Interface for WordPress. The editor improves the process and experience of creating new content, making writing rich content much simpler. It uses ‘blocks’ to add richness rather than shortcodes, custom HTML etc.
https://wordpress.org/gutenberg/ 14.8.4 RC1 by downloading the release > going to Plugins > Add New > Installing. From there, head to Gutenberg > Experiments and turn on “Off canvas navigation editor” and “Block inspector tabs” experiments.
Head to Tools > Import and import this file (click “Download” in the upper right hand corner first) to have access to the same content as above.
If you have any issues with manual setup, just comment on the post or pingPingThe act of sending a very small amount of data to an end point. Ping is used in computer science to illicit a response from a target server to test it’s connection. Ping is also a term used by Slack users to @ someone or send them a direct message (DM). Users might say something along the lines of “Ping me when the meeting starts.” me (@annezazu) in WordPress.orgWordPress.orgThe community site where WordPress code is created and shared by the users. This is where you can download the source code for WordPress core, plugins and themes as well as the central location for community conversations and organization. https://wordpress.org/slackSlackSlack is a Collaborative Group Chat Platform https://slack.com/. The WordPress community has its own Slack Channel at https://make.wordpress.org/chat/.
Explore browse mode
Head to Appearance > Editor (betaBetaA pre-release of software that is given out to a large group of users to trial under real conditions. Beta versions have gone through alpha testing in-house and are generally fairly close in look, feel and function to the final product; however, design changes often occur as part of the process.). This will bring you to a reorganized view of the site editor.
Click Templates and notice the list of templates now shown in the sidebar. Click through various templates to quickly view them.
Select “Home” from the templates and then select “Edit” in the open sidebar to directly alter the template.
Editing navigation
Select the HeaderHeaderThe header of your site is typically the first thing people will experience. The masthead or header art located across the top of your page is part of the look and feel of your website. It can influence a visitor’s opinion about your content and you/ your organization’s brand. It may also look different on different screen sizes. of your site before selecting the navigation block. Within the navigation block, select the page list block and choose “edit” from the block toolbar. This will open a prompt explaining that a step must be taken before you can customize your menu. Select “Customize”. You can also select the option to “Customize” from the block settings sidebar.
Open your block settings and notice that each menu item is now listed in the sidebar.
Spend some time condensing the menu down as you see fit to just three top level menu items. You can do this by dragging and dropping the menu items in the sidebar, deleting items, and renaming them. For example, you can list “Press” under “About” and “Resources” under “Getting Started”.
Explore the additional tabs in the block settings (Styles, Settings) to customize further to your liking. For example, you can change the typography, block spacing, or how it appears on mobile. When done, click “Save”.
Afterwards, select the navigation block once more and, in the list view tab of the block settings, select the menu name and choose the option to “Create new menu” in the dropdown.
Select the + button in the same tab to add in simply the “Contact”, “About”, and “Getting Started” page.
Head to the Settings tab and open the “Advanced” section to rename the menu to something like “Simplified main menu”. When done, click “Save”.
Heading back to the List View tab in the block settings section, click on the menu name to open a drop down and select which menu you’d like to display from there.
Redesigning the homepage
Select the Query Loop block and, from the block toolbar, select the “Replace” option.
This will open up a modal where you can pick a different pattern to display the posts. Choose a different pattern.
Customize the pattern you chose further. For example, change the featured imageFeatured imageA featured image is the main image used on your blog archive page and is pulled when the post or page is shared on social media. The image can be used to display in widget areas on your site or in a summary list of posts. size, add a duotone filterFilterFilters are one of the two types of Hooks https://codex.wordpress.org/Plugin_API/Hooks. They provide a way for functions to modify data of other functions. They are the counterpart to Actions. Unlike Actions, filters are meant to work in an isolated manner, and should never have side effects such as affecting global variables and output., remove or add blocks, change the size of the titles of posts, etc. When done, click “Save”.
Changing Styles
Open Styles and either choose “Browse Styles” to pick a different style variation or make adjustments as you see fit using the Styles system. For example, you can customize the appearance of individual blocks with the “Blocks” section using the new preview option or change overall options with Typography, Color, and Layout.
When done, select the icon that looks like an eye from the main Styles interface. Here’s a screenshot in case it’s helpful. This will open up an interface called the “stylebook” where you can see the styles for every block displayed. You can click that icon to toggle this option on/off.
Tweak anything you’d like further while using the stylebook before, when done, clicking “Save”.
Bonus: Customize further as you see fit
What follows are various ways you can take this test further. Feel free to try all or none, depending on how much time you have:
Add custom CSSCSSCSS is an acronym for cascading style sheets. This is what controls the design or look and feel of a site. using the Styles > Custom fieldCustom FieldCustom Field, also referred to as post meta, is a feature in WordPress. It allows users to add additional information when writing a post, eg contributors’ names, auth. WordPress stores this information as metadata. Users can display this meta data by using template tags in their WordPress themes. as part of the input for custom CSS work in Global Styles.
Explore browse mode more by switching between and editing different templates or template parts.
Add or edit more blocks and explore the split settings options within.
With each major WordPress release, there are more people who are likely to be in the position of switching to a blockBlockBlock is the abstract term used to describe units of markup that, composed together, form the content or layout of a webpage using the WordPress editor. The idea combines concepts of what in the past may have achieved with shortcodes, custom HTML, and embed discovery into a single consistent API and user experience. theme world from a classic theme. With 6.1 approaching in November, this call for testing is rooted in exploring that experience. The form of this test is going to be both prescriptive with steps to take in order to ensure certain features are covered and, at points, open ended so you can explore and think of areas to improve.
To make it more fun, you’re going to step into the shoes as the owner of the GutenbergGutenbergThe Gutenberg project is the new Editor Interface for WordPress. The editor improves the process and experience of creating new content, making writing rich content much simpler. It uses ‘blocks’ to add richness rather than shortcodes, custom HTML etc.
https://wordpress.org/gutenberg/ Gallery website. A simple site focused on sharing information about exhibits, current calls for submissions, and ways to stay in touch. After hearing about full site editing features for a while now, you’re deciding to take the plunge and switch from the trusty Twenty Twenty theme to Twenty Twenty-Two. Along the way, you’ll interact with the following and more:
Theme switching
As we’ve explored previously with switching between block themes, there are a lot of both quick wins and overarching decisions to be made. The same is true for switching from classic to block themes. For example, right now there’s not a clear pathway for widgets. Ultimately, the more insights around how to ease this experience and make it feel magical, the more relevant block themes become.
Improved fallbacks and menu management with the navigation block
To offer a better “out of the box” experience with the navigation block, various fallback options have been implemented so the menu you are most likely to want to use is available. This test seeks to explore that and ensure it does truly provide a better default experience. Separately, the interface for menu selection and management has been moved to a dedicated section in the block settings to make it more prominent and easier to work with. You can also pick from a set of icons to better personalize your mobile menu.
New HeaderHeaderThe header of your site is typically the first thing people will experience. The masthead or header art located across the top of your page is part of the look and feel of your website. It can influence a visitor’s opinion about your content and you/ your organization’s brand. It may also look different on different screen sizes. and Footer Patterns
Coming to 6.1, these carefully designed block patterns represent a consolidation of recurring headers and footers, simplified in order to work well across themes.When it comes to embracing a block theme, these should help folks quickly find the basics of what they might need to make a site their own in a few clicks.
Zoomed out mode
This experimental tool allows you to focus more on site building than on editing granular blocks by both allowing you to see the entire layout a bit more and always selecting the top level block (often container blocks like Groups or Template Parts). If you use the Quick Inserter, you’re met with patterns instead of blocks to continue the emphasis on more high level actions one might take to customize.
CategoryCategoryThe 'category' taxonomy lets you group posts / content together that share a common bond. Categories are pre-defined and broad ranging. Templates
This test once more explores creating a category specific template in order to offer a more tailored experience of looking at specific folks. This aligns nicely with the Gutenberg Gallery where you might want to emphasize different things depending on whether someone is looking at the posts about submissions or exhibit recaps.
Design tools galore
It’s hard to miss how many design tools have been added to even more blocks. Because there are so many new options, this test doesn’t necessarily dive into the details like they have in the past. Instead, please note and explore the various additional options unlocking new possibilities as you go.
Testing Instructions
Note on InstaWP
As noted previously, the folks behind InstaWP have granted the outreach program an account that we can use for these calls for testing. This means if you want to skip setting up your own test site and instead use a temporary one, you can do so. When you set up a site with InstaWP, no email addresses will be collected which means you’ll need to save the link to access the site again. Big thank you to the InstaWP team for making it even easier for folks to participate in the future of WordPress.
Please do not repeatedly open this link as it creates a new site each time and there’s a limit of 50 sites that can be created.
This will launch a site for you to use for up to 24 hours. Select “Access Now” to log in to the wp-admin dashboard.
Save the link to your site so you can access it again during the test.
To set up your own test site:
Have a test site using the latest version of WordPress. It’s important this is not a production/live site.
Install and activate the Twenty Twenty theme by going to Appearances > Themes.
Install and activate the latest version of Gutenberg by going to Plugins > Add New > Searching Gutenberg.
Head to Tools > Import and import this file to have access to the same posts as above.
Get familiar with your current site
View the front end of your site and click through various pages linked to from the menu.
Head to Appearance > CustomizerCustomizerTool built into WordPress core that hooks into most modern themes. You can use it to preview and modify many of your site’s appearance settings. and change any settings you’d like or just review what’s there (for example, check which menu is set to each location).
After activating, view the front end of your site to get a sense of the changes.
From there, head to Appearance > Editor.
Use Styles and the zoomed out view to design your site
In the top toolbar, select the zoomed out view option (the option furthest on the right). This will place you in a zoomed out mode where you can focus more on building and creating with patterns rather than individual blocks.
While in this mode, explore the various sections of your site and feel free to reorganize as you’d like. For example, you can try using the quick inserter to add various patterns.
Once done, with the zoomed out mode still on, open the Styles sidebarSidebarA sidebar in WordPress is referred to a widget-ready area used by WordPress themes to display information that is not a part of the main content. It is not always a vertical column on the side. It can be a horizontal rectangle below or above the content area, footer, header, or any where in the theme..
Select the option to browse styles and notice how your site changes as you switch between. Feel free to toggle on and off the zoomed out mode as you see fit for the rest of this test.
As you’d like, feel free to customize the Style options further on a more granular basis or just stick with one of the built in Style variations.
Customize your navigation
Ensure you’ve exited out of the zoomed out mode and select the navigation block, either by using List View or by clicking on it directly.
Once selected, click on “Edit” in the block toolbar and follow the steps to convert to links in the pop up.
Add two submenu items under Blog for both Submissions and Exhibits to match the original site. Note: Intentionally not sharing the various ways to do this.
Open the block settings for the navigation block and, under Display, click on the visual below to open up more options for the mobile menu icon. Select whichever one you want.
Change further aspects of the navigation block as you see fit. For example, you can change the colors under Color, spacing between navigation items under Dimensions, or various typography options.
With the block settings open, under “Menu” explore the process to create a new menu by clicking on the name of the current menu > selecting “Create new menu”.
Add some items to this new menu.
With the block settings open, switch between different menu options, including the option to import a classic menu. Select whichever menu you’d like to use.
Explore new headers or footers
Using List View, select the header or footer.
Open the three dot menu and click “Replace”.
Try searching for different options, scrolling, and selecting a new one. Repeat this as much as you’d like!
Save your changes and note how the multi-entity saving feels.
Create a category specific
Click on the W menu and select “Templates” to reach the template list.
Select “Add New” and choose “Category”.
Choose the “Category: For a specific item” option and choose “Submissions Opportunities”.
This will create a new template that you can customize to your liking. For example, perhaps you want to change the emphasis on images in the Query LoopLoopThe Loop is PHP code used by WordPress to display posts. Using The Loop, WordPress processes each post to be displayed on the current page, and formats it according to how it matches specified criteria within The Loop tags. Any HTML or PHP code in the Loop will be processed on each post. https://codex.wordpress.org/The_Loop block, add or remove different blocks, change the design, etc.
Save changes and view the Submission Opportunities category. Note: Intentionally not sharing the various ways to do this.
Customize your site further – here are some ideas:
You’ll notice the Blog page doesn’t have any content now after switching. You can either add a Query Loop block or change the Settings > Reading to set the Posts Page as the Blog page. Note: this has been filed as an enhancement issue.
Explore adding the Comments block to different templates and what might make the experience better.
Try locking parts of your site in various ways as you are happy with the design.
Use the many new design tools to change padding, margin, typography, color, border, and more.
What to notice:
Did the experience crash at any point?
Did the saving experience work properly?
What did you find particularly confusing or frustrating about the experience?
What did you especially enjoy or appreciate about the experience?
What would have made this experience easier?
Did you find that what you created matched what you saw on your site?
This call for testing returns us to some of the basics of using the blockBlockBlock is the abstract term used to describe units of markup that, composed together, form the content or layout of a webpage using the WordPress editor. The idea combines concepts of what in the past may have achieved with shortcodes, custom HTML, and embed discovery into a single consistent API and user experience. editor. While it can be fun and exciting to dig into the cutting edge items, it’s just as important to ensure the baseline experience continues to be excellent. This is especially true when full site editing as a concept brings the block paradigm to more parts of the site experience. To that end, the format of this test is going to take on a more open ended, scavenger hunt style experience. As you go through it, you’ll explore the following various features:
Transform menu
Each block offers various blocks you can transform to and from in order to quickly take the same content you currently have and switch it into a new block.
Select text across blocks
This feature was launched in WordPress 6.0 and works with any Rich Text block (Paragraph, Heading, List, and Quote). How can it be improved though? What rough edges can you find?
Drag and drop
Drag and drop is a classic part of the block editor experience, whether you’re writing a post or creating a template. As WordPress evolves with new blocks and new features, it’s important these original features continue to perform and remain reliable.
Various add block options
Adding blocks comes in a few forms: the inserter, slash inserter (/), quick inserter, sibling inserter, and the “insert before/after” options built into the additional menu of each block. Ensuring each appears and functions as expected is key to being able to create what you want with blocks.
The fields for post format, slug, template, and authors are aligned and have the same width. The template displays ‘default template’ instead of none, and the Permalink link opens a popover to edit the slug, when clicked. The result is a cleaner, more organized display that should help you more readily access all the important information about your post/page at a glance.
Using patterns
Patterns are increasingly important to the creation process and this test explores the basics of adding, moving, and customizing them.
And more!
This covers the high level items but you can expect to also use duotone, dimension controls, featured imageFeatured imageA featured image is the main image used on your blog archive page and is pulled when the post or page is shared on social media. The image can be used to display in widget areas on your site or in a summary list of posts. in a cover block, etc if you complete each smaller task.
Testing Instructions
Note on InstaWP
The folks behind InstaWP have granted the outreach program an account that we can use for these calls for testing. This means if you want to skip setting up your own test site and instead use a temporary one, you can do so. When you set up a site with InstaWP, no email addresses will be collected which means you’ll need to save the link to access the site again. Big thank you to the InstaWP team!
Install and activate the latest version of GutenbergGutenbergThe Gutenberg project is the new Editor Interface for WordPress. The editor improves the process and experience of creating new content, making writing rich content much simpler. It uses ‘blocks’ to add richness rather than shortcodes, custom HTML etc.
https://wordpress.org/gutenberg/ by going to Plugins > Add New > Searching Gutenberg.
Head to Tools > Import and import this file to have access to the same posts as above. Select the “download” icon in the upper right corner to first download the file and proceed with downloading if you see a warning. Here are instructions for how to import content if you need more detailed steps.
Overview of content on the test site
Once your test site is in place, please perform the following tasks in one or more of the three posts available in whatever order you’d like! None of the posts have a featured image set and they are all intentionally set as drafts. You do not need to run through all of these and it’s intentional that the task is left open ended, where there might be multiple ways to accomplish the task at hand. While the list looks long, each task should be quick, needing typically just a few seconds of action so please run through as many as you can.
Align, move, and customize images
Place an image side by side in whatever way you see fit.
Select two images and move them to a different location in the post. Note: you might need to add an additional image first to do this.
Customize borders for an image including Color, Style, and Width.
Crop an image in the post editor.
Add a duotone filterFilterFilters are one of the two types of Hooks https://codex.wordpress.org/Plugin_API/Hooks. They provide a way for functions to modify data of other functions. They are the counterpart to Actions. Unlike Actions, filters are meant to work in an isolated manner, and should never have side effects such as affecting global variables and output..
Add a custom duotone filter of your choosing and then remove the filter altogether.
Transform an Image block to a Cover block and set the focus using the focal point picker.
Replace an image with a different one.
Drag and drop an image to a new part of the post.
Add an image from a URLURLA specific web address of a website or web page on the Internet, such as a website’s URL www.wordpress.org.
Add an image by dragging and dropping one into the Image block placeholder from your computer.
Add a link to an image.
Add alt text to an image.
Add, move, transform text blocks
Try using as many of the various inserters (slash aka /, quick inserter, and sibling) as possible.
Transform a text block to another block of your choosing. See how many transforms you can go through before getting stuck or confused.
Merge two paragraphs together.
Rearrange items in a list block.
Transform a list block to another block and transform it back to a list.
Select text across two paragraphs, cut the text, and paste it elsewhere in the post.
Transform a Text block to a Heading block and customize it by adding margins, changing the letter case, etc.
Select text between two paragraphs and see what happens if you try to change it to a Group block (row/group/stack). Here’s a screenshot.
Add a heading or list to a quote block. Try transforming those same blocks from within the quote block.
Make each paragraph a different font size. Note: this might mean adding your own custom size.
Copy and paste text from another website/post/document of your choosing into your post.
Insert and reorder patterns
Add a few patterns from the inserter in quick succession. Reorder them in whatever way you’d like after adding multiple patterns.
Remove the entirety of a pattern after adding it.
Drag and drop a pattern from the inserter in between two blocks or patterns in the post.
Adjust the document settings
Change the template that the post is using.
Copy the URL of the post as if you were going to share it with someone.
Schedule an update to the post for sometime tomorrow before changing your mind and publishing the updates now.
Add a featured image.
Add a cover block and set it to use the featured image.
What to notice:
Did the experience crash at any point?
Did the saving experience work properly?
What did you find particularly confusing or frustrating about the experience?
What did you especially enjoy or appreciate about the experience?
What would have made this experience easier?
Did you find that what you created matched what you saw on your site?
This call for testing focuses on what, on the surface, feels like a common task you might have done in the Site Editor: creating a new template and applying it to some posts. As you go through the tasks though, the way the following features align will hopefully surprise you and show you a greater layer of depth in the site editing experience.
More template options
Expanding what templates can be created from the Site Editor continues to be a high priority with a number of new options to explore. This test in particular will focus on the general CategoryCategoryThe 'category' taxonomy lets you group posts / content together that share a common bond. Categories are pre-defined and broad ranging. template but stay tuned for Gutenberg 13.7 (the next version) when you’ll be able to create a template for a specific category. This means you could have a different template for all your posts categorized as “WordPress” for example! Depending on when you participate in this call for testing, that means you might have access to this new option to explore too.
New template picker design
GutenbergGutenbergThe Gutenberg project is the new Editor Interface for WordPress. The editor improves the process and experience of creating new content, making writing rich content much simpler. It uses ‘blocks’ to add richness rather than shortcodes, custom HTML etc.
https://wordpress.org/gutenberg/ 13.6 offers a new, streamlined template picker design that helps both conserve space and more naturally align with other post details:
Using a featured imageFeatured imageA featured image is the main image used on your blog archive page and is pulled when the post or page is shared on social media. The image can be used to display in widget areas on your site or in a summary list of posts. in a Cover blockBlockBlock is the abstract term used to describe units of markup that, composed together, form the content or layout of a webpage using the WordPress editor. The idea combines concepts of what in the past may have achieved with shortcodes, custom HTML, and embed discovery into a single consistent API and user experience.
Helpful Hint: As you go through this test, you might find the List View helpful while navigating between content.
Note on InstaWP
The folks behind InstaWP have granted the outreach program an account that we can use for these calls for testing. This means if you want to skip setting up your own test site and instead use a temporary one, you can do so. When you set up a site with InstaWP, no email addresses will be collected which means you’ll need to save the link to access the site again. Big thank you to the InstaWP team!
This will launch a site for you to use for up to 24 hours. Select “Access Now” to log in to the wp-admin dashboard.
Save the link to your site so you can access it again during the test.
Navigate to Appearance > Editor (betaBetaA pre-release of software that is given out to a large group of users to trial under real conditions. Beta versions have gone through alpha testing in-house and are generally fairly close in look, feel and function to the final product; however, design changes often occur as part of the process.). This will automatically open the site editor to the template powering your homepage.
To set up your own test site:
Have a test site using the latest version of WordPress. It’s important this is not a production/live site.
Install and activate the Gutenberg pluginPluginA plugin is a piece of software containing a group of functions that can be added to a WordPress website. They can extend functionality or add new features to your WordPress websites. WordPress plugins are written in the PHP programming language and integrate seamlessly with WordPress. These can be free in the WordPress.org Plugin Directory https://wordpress.org/plugins/ or can be cost-based plugin from a third-party. from Plugins > Add New. If you already have it installed, make sure you are using at least Gutenberg 13.6.
From there, navigate to Appearance > Editor (beta). This will automatically open the site editor to the template powering your homepage.
Create a category template
Once there, open the W menu > Templates. This will open up the template list. If you have a set site icon, you will see that instead of the big W.
Choose “Add New” > Select “Category”. This will open up a new blank template.
As you’d like, add any HeaderHeaderThe header of your site is typically the first thing people will experience. The masthead or header art located across the top of your page is part of the look and feel of your website. It can influence a visitor’s opinion about your content and you/ your organization’s brand. It may also look different on different screen sizes. or Footer template parts. You can do this by searching directly for “Header” or “Footer” or by adding the template part block and selecting the one you’d like.
Add a Query LoopLoopThe Loop is PHP code used by WordPress to display posts. Using The Loop, WordPress processes each post to be displayed on the current page, and formats it according to how it matches specified criteria within The Loop tags. Any HTML or PHP code in the Loop will be processed on each post. https://codex.wordpress.org/The_Loop block and select whichever design option you’d like.
While selecting the Query Loop block, open the block settings sidebarSidebarA sidebar in WordPress is referred to a widget-ready area used by WordPress themes to display information that is not a part of the main content. It is not always a vertical column on the side. It can be a horizontal rectangle below or above the content area, footer, header, or any where in the theme. and ensure the option “Inherit query from template” has been selected. This will ensure that the right posts appear.
Customize the template further as you see fit keeping in mind that this template will be used when viewing a specific category of posts. When done, hit save to publish the new template.
Create two new posts to explore patterns
Open the W menu (if you have a set site icon, you will see that instead) and select “Dashboard” to return to your wp-admin dashboard.
Under Posts > Add New to create a new post.
Select the “New Event Announcement” pattern and fill in details as you’d like. For inspiration, in your post lists, there’s an example post titled “WordCampWordCampWordCamps are casual, locally-organized conferences covering everything related to WordPress. They're one of the places where the WordPress community comes together to teach one another what they’ve learned throughout the year and share the joy. Learn more. Museum” using this pattern. Note that a few blocks are locked! Explore what this experience is like (lock more blocks, unlock current ones, etc).
Set a featured image and notice how it also appears in the Cover block of the pattern. Feel free to customize this further.
Before publishing, open the post settings, assign the category “Events”, and under “Template” feel free to select a different template with the new pop over interface.
Return to the dashboard and create another new post.
Select the “Event Recap” pattern and fill in details as you’d like once more. For inspiration, in your post lists, there’s an example post titled “WordCamp Museum Recap” using this pattern. Note that a few blocks are locked! Explore what this experience is like.
Under the “Attendees” heading, select the Group block that contains the various names. Open the sidebar settings and, under “Layout”, explore the “Inner blocks use full width” option and customize to your liking (change colors, font size, dimensions, etc).
Before publishing, open the post settings, assign the category “Events”, and under “Template” feel free to select a different template with the new pop over interface.
View your category template
Once done, view the “Event” category to see your template and posts on full display. You can find the category template by going to yoursiteurl.com/category/events/
What to notice:
Remember to share a screenshot of what you created if you’re up for it!
Did the experience crash at any point?
Did the saving experience work properly?
What did you find particularly confusing or frustrating about the experience?
What did you especially enjoy or appreciate about the experience?
What would have made this experience easier?
Did you find that what you created matched what you saw on your site?
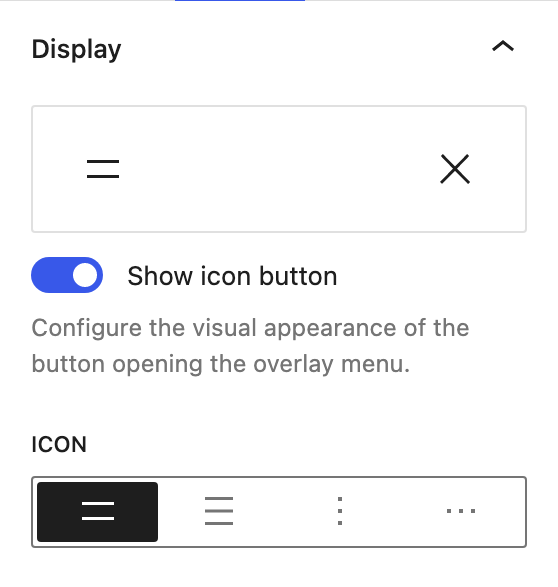
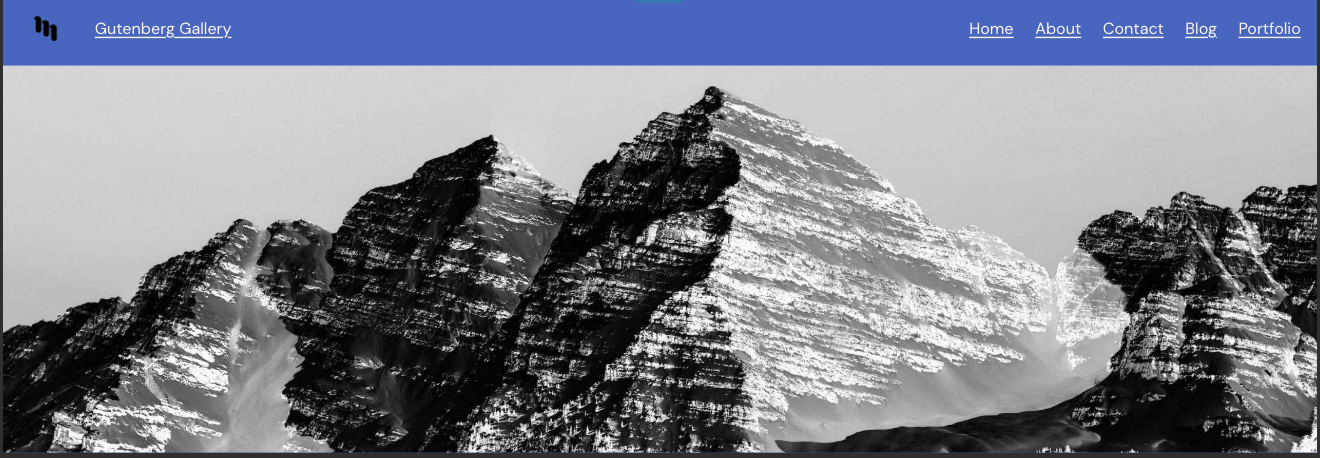
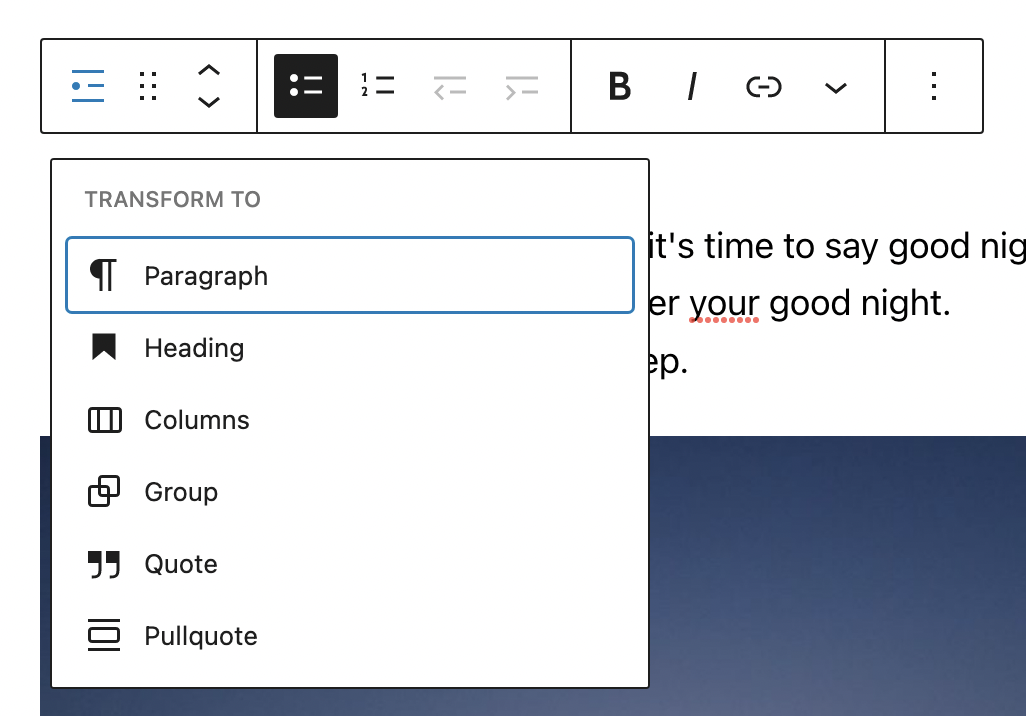

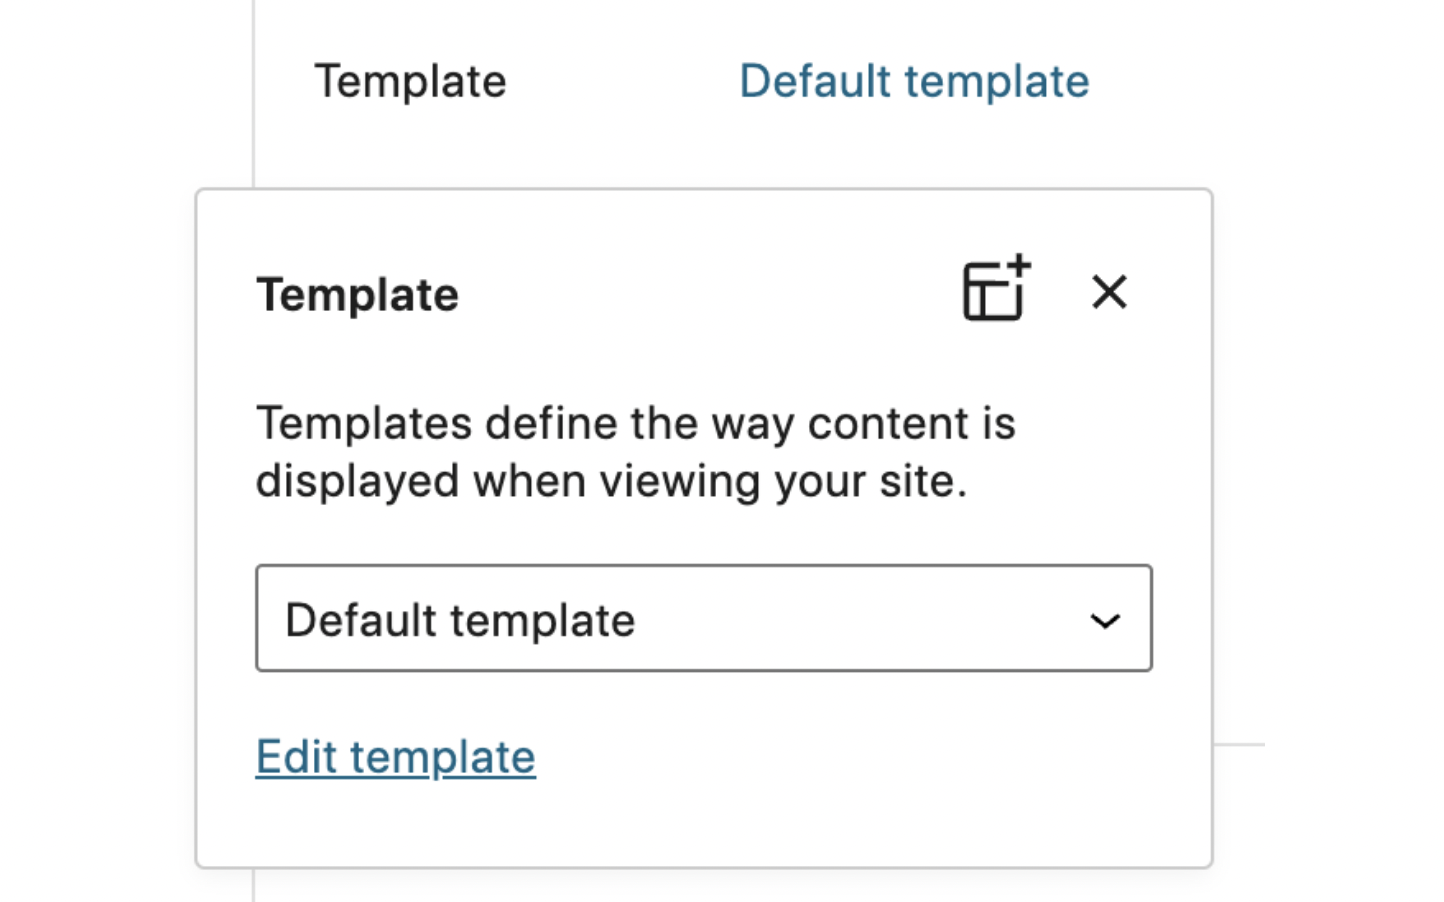
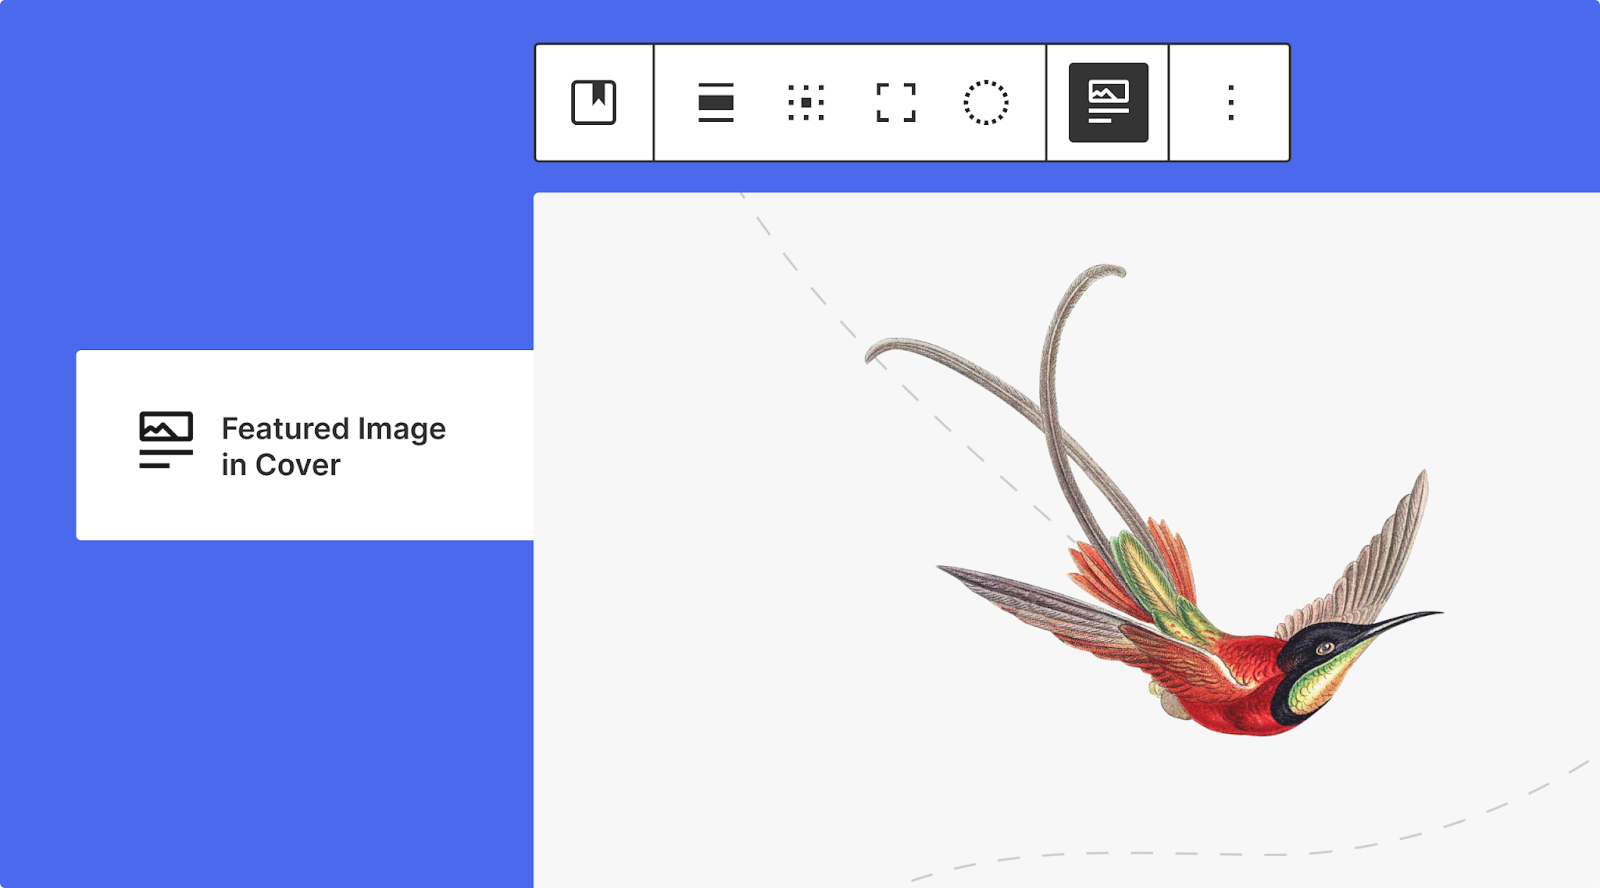
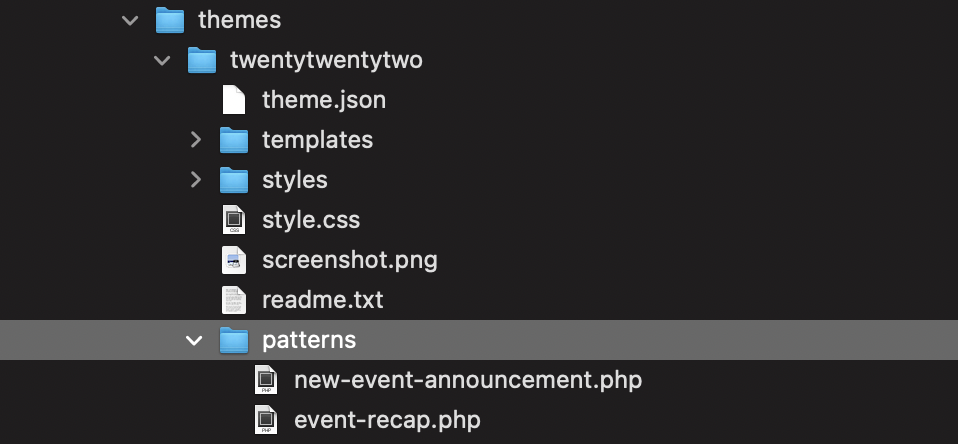
You must be logged in to post a comment.