The WordPress coreCoreCore is the set of software required to run WordPress. The Core Development Team builds WordPress. development team builds WordPress! Follow this site for general updates, status reports, and the occasional code debate. There’s lots of ways to contribute:
Found a bugbugA bug is an error or unexpected result. Performance improvements, code optimization, and are considered enhancements, not defects. After feature freeze, only bugs are dealt with, with regressions (adverse changes from the previous version) being the highest priority.?Create a ticket in the bug tracker.
XAMPP is an easy to install ApacheApacheApache is the most widely used web server software. Developed and maintained by Apache Software Foundation. Apache is an Open Source software available for free. distribution containing MySQLMySQLMySQL is a relational database management system. A database is a structured collection of data where content, configuration and other options are stored. https://www.mysql.com/., PHPPHPThe web scripting language in which WordPress is primarily architected. WordPress requires PHP 5.6.20 or higher and Perl. There are packages for Windows, Mac, and Linux.
This article will walk you through the steps to install XAMPP on your computer.
Note: These are the Windows installation instructions – see the Apache Friends website for the Mac and Linux installation instructions.
Next, you need to open the folder where you saved the file, and double-click the installer file.
You will be prompted to select the language you wish to use in XAMPP. Click the arrow in the dropdown box, select your language in the list, then click OK to continue the installation process.
For Windows 7 users, you will see a window pop up, warning you about User Account Control (UAC) being active on your system. Click OK to continue the installation.
Next you will see the Welcome To The XAMPP Setup Wizard screen. Click Next to continue the installation.
The Choose Components screen will appear next. This screen will allow you to choose which components you would like to install. To run XAMPP properly, all components checked need to be installed. Click Next to continue.
Next you will see the Choose Install Location screen. Unless you would like to install XAMPP on another drive, you should not need to change anything. Click Install to continue.
XAMPP will begin extracting files to the location you selected in the previous step.
Once all of the files have been extracted, the Completing The XAMPP Setup Wizard screen will appear. Click Finish to complete the installation.
The Installation Complete screen will now appear. Click Finish to begin using XAMPP.
After clicking Finish in the previous screen, you will be asked if you want to open the XAMPP Control Panel. Click Yes.
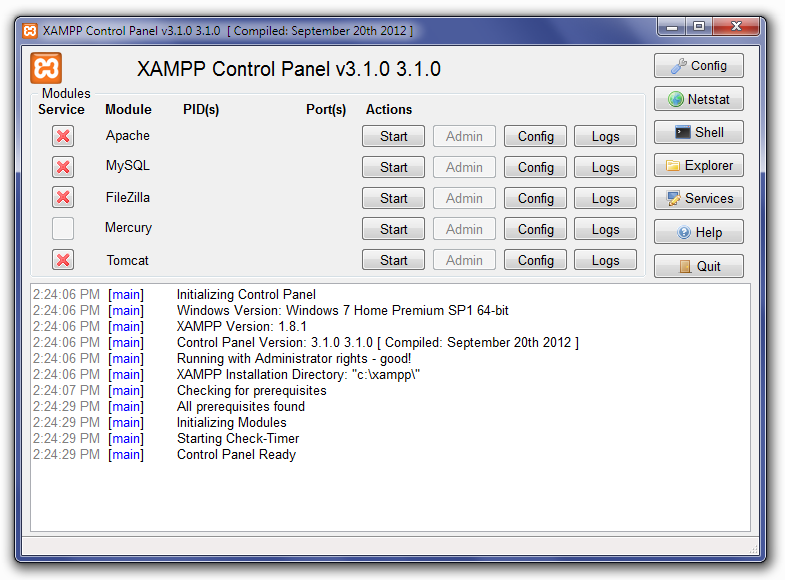
The XAMPP Control Panel allows you to manually start and stop Apache and MySQL, or install them as services.
To start Apache or MySQL manually, click the Start button under Actions next to that module.
Depending on your security settings, Windows 7 users will probably have a small window open, asking if you want to allow xampp-control.exe to make modifications to your computer. Click Yes to allow Apache or MySQL to start.
If you plan on using XAMPP frequently, you may want to consider installing Apache and MySQL as services on your computer. The advantage to this is that both modules will already be running once the XAMPP control panel opens.
To install Apache and MySQL as services, click the red X to the left of each module under Services. You will see a small window open, asking you to confirm that you want to install it as a service. Click Yes to complete the installation. Repeat for the other module.
Once again, you may have a security window open, asking if you want to allow the modifications to your computer. Click Yes to allow it.
The red X will change to a green check mark once the service has been installed successfully.
Important: After the initial setup is complete, you will need to run XAMPP as an administrator on Windows 7 when you start the program again. To do that, click Start, find XAMPP Control Panel in your Programs list, then right-click and select Run As Administrator.
The default XAMPP install is already pre-configured to run a local web server comparable to most web hosting servers. However, there are a couple basic configuration changes you can make to increase your productivity.
The first change will be to set the default text editor. As you can see, XAMPP defaults to Notepad, the native Windows text editor. Click the folder button to the right to open the file explorer. Navigate to the folder for your favorite text editor, select the .exe file, then click Open.
The next change is to select your desired font for the logs that XAMPP creates. If you are trying to track down an issue, you will spend time reading different logs, so choose a font that is easy for you to read. Click on Log Options, then select your desired font and font size, then click Save.
After making those changes, click Save in the main configuration window.
If you find that you need to make a configuration change to Apache, PHP, or MySQL, click the Config button for that module to bring up a context menu with links to the config files for that module. The file will open in the default text editor you chose earlier.
Once the configuration is done, go to http://localhost/ in your web browser. You will see the XAMPP splash screen first, asking you to select your language. The web-based XAMPP panel will then appear.
It is recommended that you secure your XAMPP install with a unique username and password for both the web panel and for phpMyAdmin.
Click the Security link in the left sidebarSidebarA sidebar in WordPress is referred to a widget-ready area used by WordPress themes to display information that is not a part of the main content. It is not always a vertical column on the side. It can be a horizontal rectangle below or above the content area, footer, header, or any where in the theme.. The XAMPP Security screen will appear. A table will show you the current security status for each component.
To secure the XAMPP panel and phpMyAdmin, click the http://localhost/security/xamppsecurity.php link to open the Security Console.
The first section deals with the MySQL user. By default, the MySQL administrator (root) has no password in XAMPP. To secure MySQL, enter your desired password in the New Password field, then again in the Repeat the new password box. Choose your authentication method (httpHTTPHTTP is an acronym for Hyper Text Transfer Protocol. HTTP is the underlying protocol used by the World Wide Web and this protocol defines how messages are formatted and transmitted, and what actions Web servers and browsers should take in response to various commands. or cookie), then click Password Changing.
The second section deals with securing the XAMPP web panel. Enter a unique username in the Username field, a strong password in the Password field, then click Make safe the XAMPP directory.
Navigate to the XAMPP Security section to check the security status of each component after completing these steps. The XAMPP directory, MySQL, and phpMyAdmin should now have a Secure status next to them.
In XAMPP, a database is created and accessed via phpMyAdmin. You can access phpMyAdmin by entering http://localhost/phpmyadmin/ in your web browser.
The phpMyAdmin login screen will appear first. Select your language, then enter the username (root) and unique password you created for the MySQL user in the previous section.
The main phpMyAdmin screen will appear. On the left is a list of databases that already exist: cdcol, information_schema, mysql, performance_schema, phpmyadmin, test, and webauth. Do not delete these, as they are necessary for XAMPP and phpMyAdmin to run properly.
To create a database, click Databases in the top navbar.
On the screen that appears, you need to enter the database name (for example, root_wordpress-trunktrunkA directory in Subversion containing the latest development code in preparation for the next major release cycle. If you are running "trunk", then you are on the latest revision.) in the left field, choose your database collation from the Collation dropdown box (utf8_unicode_ci), then click Create.
You will see a success message once the database has been created.
The default phpMyAdmin user, root, is automatically assigned to the database upon creation, and has the unique password you created in the previous step. The database connection info you will need to use when installing WordPress locally is:
/** The name of the database for WordPress */
define('DB_NAME', 'root_databasename');
/** MySQL database username */
define('DB_USER', 'root');
/** MySQL database password */
define('DB_PASSWORD', 'yourmysqlpassword');
/** MySQL hostname */
define('DB_HOST', 'localhost');
You can shut down XAMPP from the main control panel by clicking Stop next to each of the services that are running, then click Quit.
Helpful tip: You can also shut down XAMPP from the systray icon. Right-click the XAMPP icon, and a context menu will appear. Hover over the first service running, then click Stop. The green light will turn red once it has stopped. Repeat for the other services running, then click Quit to exit the program.


You must be logged in to post a comment.